apiDoc教程目录
市面上常用的API文档管理方式有apiDoc、Swagger2、DocClear。
Swagger2有一个比较明显的缺点:代码侵入,开启注解时会影响原本的系统性能。
同样DocClear也有一个比较明显的缺点:DocClear本身只是一个接口信息管理平台,所有的接口信息需要开发人员在平台内进行录入。
apiDoc作为API文档工具是一款通过源代码中的API注释创建文档,支持Java、JS、PHP、Tython等语言,没有Swagger2那样代码侵入,而是通过apiDoc的程序对我们的源代码文件进行扫描,获取文件内的apiDoc注释信息来创建API文档,进而生成静态的API文档页面。接下来就从头到尾给大家讲解一下apiDoc如何使用。
1、安装nodejs
具体请看这篇文章:node.js安装| 解决npm下载慢 | npm在项目开发中常用命令 | dependencies与devDependencies的区别 | npm build 打包配置
2、安装apiDoc
安装配置好nodejs后,在命令行界面输入:
npm install apidoc -g
3、创建apiDoc配置文件
在你的项目根目录下新建apidoc.json文件,该文件描述了项目对外提供接口的概要信息如名称、版本、描述、文档打开时浏览器显示标题和接口缺省访问地址。
实例文件:
{"name": "api-doc","version": "0.1.0","description": "接口文档描述","title": "接口文档标题","url" : "http://127.0.0.1:8091","sampleUrl" : "http://127.0.0.1:8091","order": ["系统","用户","角色","部门",],"template": {"forceLanguage": "zh_cn"}}注:1、apidoc.json文件不是必须创建在项目中,而是为了方便操作。
2、若没有配置sampleUrl参数,apiDoc最终生成的API文档内将没有测试api方法。
以下是参数说明
| 名称 | 描述 |
|---|---|
| name | 项目名称。 如果 apidoc.json该字段不存在,则apiDoc尝试从确定值package.json。 |
| version | 项目的版本。 如果 apidoc.json该字段不存在,则apiDoc尝试从确定值package.json。 |
| description | 项目简介。 如果 apidoc.json该字段不存在,则apiDoc尝试从确定值package.json。 |
| title | 浏览器标题文字。 |
| url | api路径的前缀(端点),例如 https://api.github.com/v1 |
| sampleUrl | 如果设置,则将显示用于测试api方法(发送请求)的表单。有关更多详细信息,请参见@apiSampleRequest。 |
| header | |
| title | 包含的header.md文件的导航文本。 |
| filename | 包含的header.md文件的文件名(markdown-file)。 |
| footer | |
| title | 包含的footer.md文件的导航文本。 |
| filename | 包含的footer.md文件的文件名(markdown文件)。 |
| order | 用于排序输出的api名称/组名称的列表。未定义的名称将自动显示在最后。"order": ["Error","Define","PostTitleAndError","PostError"] |
模板特定设置
以下设置特定于apiDoc的默认模板。
| 名称 | 类型 | 描述 |
|---|---|---|
| template | ||
| forceLanguage | String | 禁用浏览器语言自动检测并设置特定的语言环境。 范例: de,en。查看可用的语言环境。 |
| withCompare | Boolean | 启用与旧版api的比较。默认:true |
| withGenerator | Boolean | 在页脚输出生成器信息。默认:true |
| jQueryAjaxSetup | Object | 设置Ajax请求的默认值。 |
4、在程序中使用apiDoc进行注释
这里已Java代码为例:
先给一个代码示例,Java项目中无需添加任意依赖,只需要按照apiDoc规定的方式进行注释即可,换句话说就是把原本JavaDoc的注释形式转化为apiDoc的注释形式即可。
/** * @api {post} /urlDemo 示例接口名称 * @apiGroup 系统 * @apiVersion 0.0.1 * @apiDescription 示例接口描述 * @apiParam {String} param1 请求参数1 * @apiParam {Object} param2 请求参数2(JSON数据) * @apiParam {String} param2.name 请求参数3(属于请求参数2的一个属性) * @apiParam {Number} [param4] 请求参数4 * @apiUse ResponseBody * @apiSuccess {Object} data响应数据描述 * * @apiError _SESSION_EXPIRED 会话已过期 * @apiErrorExample {json} _SESSION_EXPIRED * HTTP/1.1 200 OK * { * "resultCode": -13, * "resultMsg": "会话已过期", * data: null * } * @apiUse ResponseBody */@PostMapping(value = "/urlDemo")public void urlDemo (@RequestBody Map<String, String> params){// ..}apiDoc参数目录
@api
@apiDefine
@apiDeprecated
@apiDescription
@apiError
@apiErrorExample
@apiExample
@apiGroup
@apiHeader
@apiHeaderExample
@apiIgnore
@apiName
@apiParam
@apiParamExample
@apiPermission
@apiPrivate
@apiSampleRequest
@apiSuccess
@apiSuccessExample
@apiUse
@apiVersion
@apiDefine
@apiDefine name [title][description]
定义要嵌入到文档块中@api或api函数之类的文档文档块@apiPermission。
@apiDefine 每个方块只能使用一次
通过使用@apiUse已定义的块,将导入该块,或使用名称和标题和说明。
用法: @apiDefine MyError
| 名称 | 描述 |
|---|---|
| 名称 | 块/值的唯一名称。可以定义 不同的相同名称 @apiVersion。 |
| 标题可选 | 简短标题。仅用于命名函数,例如@apiPermission或@apiParam (name)。 |
| 说明可选 | 详细说明从下一行开始,可以使用多行。仅用于命名函数,如@apiPermission。 |
例:
/** * @apiDefine MyError * @apiError UserNotFound The <code>id</code> of the User was not found. *//** * @api {get} /user/:id * @apiUse MyError *//** * @apiDefine admin User access only * This optional description belong to to the group admin. *//** * @api {get} /user/:id * @apiPermission admin */
@apiDeprecated
@apiDeprecated [text]
将API方法标记为不推荐使用
用法: @apiDeprecated use now (#Group:Name).
| 名称 | 描述 |
|---|---|
| 文本 | 多行文字。 |
例:
/*** @apiDeprecated*//*** @apiDeprecated use now (#Group:Name).** Example: to set a link to the GetDetails method of your group User* write (#User:GetDetails)*/
@apiDescription
@apiDescription text
API方法的详细说明。
用法: @apiDescription This is the Description.
| 名称 | 描述 |
|---|---|
| 文本 | 多行描述文字。 |
例:
/** * @apiDescription This is the Description. * It is multiline capable. * * Last line of Description. */
@apiError
@apiError [(group)] [{type}] field [description]错误返回参数。
用法: @apiError UserNotFound
| 名称 | 描述 |
|---|---|
| (组)可选 | 所有参数将按此名称分组。 如果没有组, Error 4xx则设置默认值。您可以使用@apiDefine设置标题和描述。 |
| {type}可选 | 返回类型,例如{Boolean}, {Number}, {String},{Object},{String[]}(字符串数组),... |
| 领域 | 返回标识符(返回的错误代码)。 |
| 说明可选 | 字段说明。 |
例:
/*** @api {get} /user/:id* @apiError UserNotFound The <code>id</code> of the User was not found.*/@apiErrorExample
@apiErrorExample [{type}] [title]example错误返回消息的示例,以预格式化的代码输出。
用法: @apiErrorExample {json} Error-Response:
This is an example.
| 名称 | 描述 |
|---|---|
| 输入可选 | 响应格式。 |
| 标题可选 | 该示例的简短标题。 |
| 例 | 详细的例子,多行功能。 |
例:
/*** @api {get} /user/:id* @apiErrorExample {json} Error-Response:* HTTP/1.1 404 Not Found* {* "error": "UserNotFound"* }*/@apiExample
@apiExample [{type}] titleexampleAPI方法使用示例。输出为预格式化的代码。
在端点描述的开头将其用作完整示例。
用法: @apiExample {js} Example usage:
This is an example.
| 名称 | 描述 |
|---|---|
| 输入可选 | 代码语言。 |
| 标题 | 该示例的简短标题。 |
| 例 | 详细的例子,多行功能。 |
例:
/*** @api {get} /user/:id* @apiExample {curl} Example usage:* curl -i http://localhost/user/4711 */@apiGroup
@apiGroup name
应该始终使用。
定义方法文档块属于哪个组。组将用于生成的输出中的主导航。不需要结构定义@apiGroup。
用法: @apiGroup User
| 名称 | 描述 |
|---|---|
| 名称 | 组名。也用作导航标题。 |
例:
/*** @api {get} /user/:id* @apiGroup User*/@apiHeader
@apiHeader [(group)] [{type}] [field=defaultValue] [description]描述传递给您的API标头的参数,例如用于授权。
与@apiParam类似的操作,仅输出在参数之上。
用法: @apiHeader (MyHeaderGroup) {String} authorization Authorization value.
| 名称 | 描述 |
|---|---|
| (组)可选 | 所有参数将按此名称分组。 如果没有组, Parameter则设置默认值。您可以使用@apiDefine设置标题和描述。 |
| {type}可选 | 参数类型,例如{Boolean}, {Number}, {String},{Object},{String[]}(字符串数组),... |
| 领域 | 变量名。 |
| [领域] | 带括号的字段名称将变量定义为可选。 |
| = defaultValue可选 | 参数默认值。 |
| 说明可选 | 字段说明。 |
例子:
/** * @api {get} /user/:id * @apiHeader {String} access-key Users unique access-key. */@apiHeaderExample
@apiHeaderExample [{type}] [title]example参数请求示例。
用法: @apiHeaderExample {json} Request-Example:
{ "content": "This is an example content" }
| 名称 | 描述 |
|---|---|
| 输入可选 | 请求格式。 |
| 标题可选 | 该示例的简短标题。 |
| 例 | 详细的例子,多行功能。 |
例:
/*** @api {get} /user/:id* @apiHeaderExample {json} Header-Example:* {* "Accept-Encoding": "Accept-Encoding: gzip, deflate"* }*/@apiIgnore
@apiIgnore [hint]
将其放在一个块的顶部。
@apiIgnore不会解析的块。如果您在源代码中留下了过时的方法或未完成的方法,并且不想将其发布到文档中,则这很有用。
用法: @apiIgnore Not finished Method
| 名称 | 描述 |
|---|---|
| 提示可选 | 有关为何应忽略此块的简短信息。 |
例:
/*** @apiIgnore Not finished Method* @api {get} /user/:id*/@apiName
@apiName name
应该始终使用。
定义方法文档块的名称。名称将用于生成的输出中的子导航。不需要结构定义@apiName。
用法: @apiName GetUser
| 名称 | 描述 |
|---|---|
| 名称 | 方法的唯一名称。@apiVersion可以定义不同的相同名称。格式:方法 + 路径(例如Get + User),只有建议,您可以根据需要命名。 也用作导航标题。 |
例:
/*** @api {get} /user/:id* @apiName GetUser*/@apiParam
@apiParam [(group)] [{type}] [field=defaultValue] [description]描述传递给您的API方法的参数。
用法: @apiParam (MyGroup) {Number} id Users unique ID.
对于嵌套参数,请使用方括号符号([])。
| 名称 | 描述 |
|---|---|
| (组)可选 | 所有参数将按此名称分组。 如果没有组, Parameter则设置默认值。您可以使用@apiDefine设置标题和描述。 |
| {type}可选 | 参数类型,例如{Boolean},{Number},{String},{Object},{String[]}(字符串数组),... |
| {type {size}}可选 | 有关变量大小的信息。{string{..5}}最多包含5个字符的字符串。{string{2..5}}最小的字符串 2个字符,最多5个字符。{number{100-999}}100到999之间的数字。 |
| {type = allowedValues}可选 | 有关变量的允许值的信息。{string="small"}一个只能包含单词“ small”(常量)的字符串。{string="small","huge"}一个可以包含单词“ small”或“ huge”的字符串。{number=1,2,3,99}一个数字,允许的值为1、2、3和99。可以与大小组合: {string {..5}="small","huge"}一个字符串,最多包含5个字符,并且仅包含单词“ small”或“ huge”。 |
| 领域 | 栏位名称。 |
| [领域] | 带括号的字段名称将变量定义为可选。 |
| 字段[nestedField] | 强制嵌套字段。 |
| = defaultValue可选 | 参数默认值。 |
| 说明可选 | 字段说明。 |
例子:
/** * @api {get} /user/:id * @apiParam {Number} id Users unique ID. *//** * @api {post} /user/ * @apiParam {String} [firstname] Optional Firstname of the User. * @apiParam {String} lastname Mandatory Lastname. * @apiParam {String} country="DE" Mandatory with default value "DE". * @apiParam {Number} [age=18] Optional Age with default 18. * * @apiParam (Login) {String} pass Only logged in users can post this. * In generated documentation a separate * "Login" Block will be generated. * * @apiParam {Object} [address] Optional nested address object. * @apiParam {String} [address[street]] Optional street and number. * @apiParam {String} [address[zip]] Optional zip code. * @apiParam {String} [address[city]] Optional city. */@apiParamExample
@apiParamExample [{type}] [title]example参数请求示例。
用法: @apiParamExample {json} Request-Example:
{ "content": "This is an example content" }
| 名称 | 描述 |
|---|---|
| 输入可选 | 请求格式。 |
| 标题可选 | 该示例的简短标题。 |
| 例 | 详细的例子,多行功能。 |
例:
/*** @api {get} /user/:id* @apiParamExample {json} Request-Example:* {* "id": 4711* }*/@apiPermission
@apiPermission name
输出权限名称。如果名称是@apiDefine在生成的文档中定义的,则包括其他标题和描述。
用法: @apiPermission admin
| 名称 | 描述 |
|---|---|
| 名称 | 权限的唯一名称。 |
例:
/*** @api {get} /user/:id* @apiPermission none*/@apiPrivate
@apiPrivate
将API定义为私有的,以允许创建两个API规范文档:一个排除私有API,而包括私有API。
用法: @apiPrivate
命令行用法来排除/包括私有API: --private false|true
例:
/*** @api {get} /user/:id* @apiPrivate*/@apiSampleRequest
@apiSampleRequest url
将此参数与apidoc.json配置参数sampleUrl结合使用。
如果sampleUrl设置为,则所有方法都将具有api测试表单(将附加@api的端点)。
如果不使用sampleUrl,则只有的方法@apiSampleRequest将具有形式。
如果@apiSampleRequest url在方法块中设置了if ,则此url将用于请求(当它以http开头时,它将覆盖sampleUrl)。
如果sampleUrl设置为if 并且您不想要带有测试表单的方法,则将其添加@apiSampleRequest off到documentation块中。
用法: @apiSampleRequest http://test.github.com
| 名称 | 描述 |
|---|---|
| 网址 | 网址到您的测试API服务器。 覆盖配置参数sampleUrl并附加@api url: @apiSampleRequest http://www.example.com在@api url之前添加前缀: @apiSampleRequest /my_test_path如果设置了配置参数sampleUrl,则禁用api测试: @apiSampleRequest off |
例子:
这会将api请求发送到http://api.github.com/user/:id
Configuration parameter sampleUrl: "http://api.github.com"/*** @api {get} /user/:id*/这会将api请求发送到http://test.github.com/some_path/user/:id。
它将覆盖sampleUrl。
Configuration parameter sampleUrl: "http://api.github.com"/*** @api {get} /user/:id* @apiSampleRequest http://test.github.com/some_path/*/这会将api请求发送到http://api.github.com/test/user/:id。
它扩展了sampleUrl。
Configuration parameter sampleUrl: "http://api.github.com"/*** @api {get} /user/:id* @apiSampleRequest /test*/这将禁用此api方法的api请求。
Configuration parameter sampleUrl: "http://api.github.com"/*** @api {get} /user/:id* @apiSampleRequest off*/这会将api请求发送到http://api.github.com/some_path/user/:id
,因为未设置sampleUrl,所以仅激活此方法的请求。
Configuration parameter sampleUrl is not set/*** @api {get} /user/:id* @apiSampleRequest http://api.github.com/some_path/*/@apiSuccess
@apiSuccess [(group)] [{type}] field [description]成功返回参数。
用法: @apiSuccess {String} firstname Firstname of the User.
| 名称 | 描述 |
|---|---|
| (组)可选 | 所有参数将按此名称分组。 如果没有组, Success 200则设置默认值。您可以使用@apiDefine设置标题和描述。 |
| {type}可选 | 返回类型,例如{Boolean}, {Number}, {String},{Object},{String[]}(字符串数组),... |
| 领域 | 返回标识符(返回成功代码)。 |
| 说明可选 | 字段说明。 |
例:
/*** @api {get} /user/:id* @apiSuccess {String} firstname Firstname of the User.* @apiSuccess {String} lastname Lastname of the User.*/的示例(group),@apiSuccess更多组示例:
/*** @api {get} /user/:id* @apiSuccess (200) {String} firstname Firstname of the User.* @apiSuccess (200) {String} lastname Lastname of the User.*/对象示例:
/** * @api {get} /user/:id * @apiSuccess {Boolean} active Specify if the account is active. * @apiSuccess {Object} profile User profile information. * @apiSuccess {Number} profile.age Users age. * @apiSuccess {String} profile.image Avatar-Image. */数组示例:
/** * @api {get} /users * @apiSuccess {Object[]} profiles List of user profiles. * @apiSuccess {Number} profiles.age Users age. * @apiSuccess {String} profiles.image Avatar-Image. */@apiSuccessExample
@apiSuccessExample [{type}] [title]example成功返回消息的示例,以预格式化的代码输出。
用法: @apiSuccessExample {json} Success-Response:
{ "content": "This is an example content" }
| 名称 | 描述 |
|---|---|
| 输入可选 | 响应格式。 |
| 标题可选 | 该示例的简短标题。 |
| 例 | 详细的例子,多行功能。 |
例:
/*** @api {get} /user/:id* @apiSuccessExample {json} Success-Response:* HTTP/1.1 200 OK* {* "firstname": "John",* "lastname": "Doe"* }*/@apiUse
@apiUse name
包括一个带有@apiDefine定义的块。如果与@apiVersion相同或最接近的前任产品一起使用,则将包括在内。
用法: @apiUse MySuccess
| 名称 | 描述 |
|---|---|
| 名称 | 定义块的名称。 |
例:
/** * @apiDefine MySuccess * @apiSuccess {string} firstname The users firstname. * @apiSuccess {number} age The users age. *//** * @api {get} /user/:id * @apiUse MySuccess */@apiVersion
@apiVersion version
设置文档块的版本。版本也可以在中使用@apiDefine。
具有相同组和名称但不同版本的块可以在生成的输出中进行比较,因此您或前端开发人员可以追溯自上一个版本以来API中的更改。
用法: @apiVersion 1.6.2
| 名称 | 描述 |
|---|---|
| 版本 | 支持简单版本控制(major.minor.patch)。 |
例:
/*** @api {get} /user/:id* @apiVersion 1.6.2*/5、@apiGroup兼容中文解决方法
apiDoc的@apiGroup是默认不支持中文需要我们单独处理一下:
1.找到安装目录中api_group.js
centos安装目录:/usr/lib/node_modules/apidoc/node_modules/apidoc-core/lib/workers/api_group.js
window安装目录:C:\Users\Administrator\AppData\Roaming\npm\node_modules\apidoc\node_modules\apidoc-core\lib\workers\api_group.js
2.注释代码
将83行的替换代码注释:
//group = group.replace(/[^\w]/g, '_');
6、apiDoc兼容Ajax json格式请求提交解决方法
1.找到安装目录中的send_sample_request.js
[前缀参考前文]\apidoc\template\utils
2.将96行的ajax form表单的提交请求,替换成下面的这个:
// send AJAX request, catch success or error callback
$.ajax({
url: url,
dataType: "json",
contentType: "application/json",
data: JSON.stringify(param),
headers: header,
type: type.toUpperCase(),
success: displaySuccess,
error: displayError
});
7、生成API文档
在第三节创建的apiDoc.json的目录位置打开命令行窗口,执行:
apidoc -i [项目完整路径] -o apidoc/
例如:
apidoc -i G:/Project/demo/ -o apidoc/
参数说明:
| 参数 | 描述 |
|---|---|
| -f,--file-filters | RegEx-Filter选择要解析的文件(可以使用许多-f)。默认.cs .dart .erl .go .java .js .php .py .rb .ts。示例(仅解析.js和.ts文件): apidoc -f ".*\\.js$" -f ".*\\.ts$" |
| -i, --input | 输入/源目录名。项目文件的位置。 例: apidoc -i myapp/ |
| -o, --output | 输出目录名。放置生成的文档的位置。 例: apidoc -o apidoc/ |
| -t, --template | 使用模板输出文件。您可以创建和使用自己的模板。 例: apidoc -t mytemplate/ |
| -e, --exclude | 输出文件时排除文件。 例: apidoc -e asset/ |
在项目中某些目录不需要扫描,API生成,则需要使用-e参数
例如:
apidoc -i G:/Project/demo/ -o apidoc/ -e web
命令执行成功后,将会输出:
{"message":"Done.","level":"info"}此时我们可以在当前目录下看到,多了一个apidoc的文件夹,这个文件就是apiDoc生成的API文档。
打开文件夹可以看到类似如下内容:
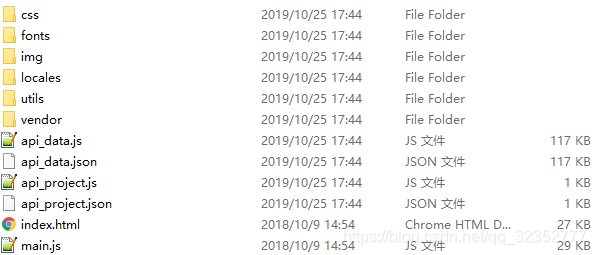
此时我们打开index.html就可以看到我们通过在接口上添加的注释所生成的API文档了。
打开网页,可以看到如下内容:
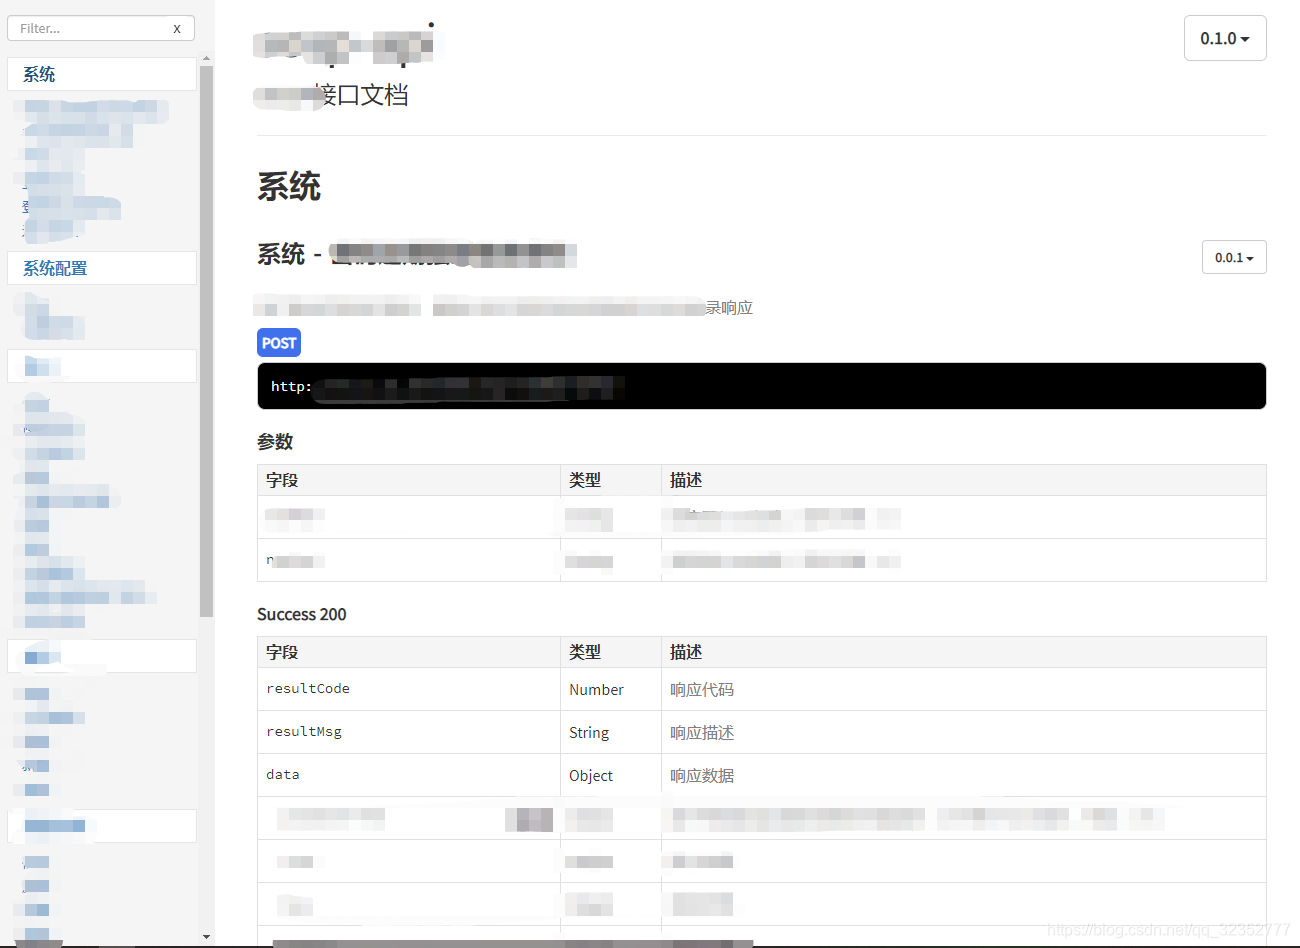
通过网页内容,我们可以看到页面内有接口接口名称、接口描述、请求类型、接口参数说明、接口成功响应内容、接口异常内容、测试接口入口等内容。
这时我们就可以很方便的进行API查阅和测试了。
注:如果接口发生变化,只需要修改对应的代码注释再次通过命令进行API文档生成即可。
参考文档:apiDoc官网